We had a great Thanksgiving day with friends and family. My tiny house was stuffed with people, and I'm thankful that they love us enough to come over and spend time with us.
Now, looking forward, I'm thankful that I will be getting $25 in free beads on Saturday! And you can too! Actually you can spend a free $25 in any participating small business if you have an American Express card and you sign up before you shop at this link. Once you sign up, they show you a list of small businesses in your area that are participating. When you spend $25 in one of them, you get a $25 credit back from American Express on your card statement. It's a win-win for both you and the business.
My local bead store participates, so I'll be there stocking up just like I did for last year's Small Business Saturday. Wheee!
Even if you don't have an Amex card, please shop at a small business near your home this weekend on Small Business Saturday. It's a great way to show your support for the people who work so hard to keep their small business open in your area all year long.
Cat
Thursday, November 22, 2012
Wednesday, November 21, 2012
Happy Thanksgiving
Just a very short post from me today. I want to wish everyone who celebrates it a happy Thanksgiving!
I took a lot of pictures this morning of jewelry to upload to my ArtFire store, but I have been putting off uploading them and creating the listings. I love making beady things, the other tasks that go with the selling, I do not like so much. I need some elves to help me. :)
Here is a picture of one I made the other day, design by Noriko Romanko. For the ends, I used silver end caps. Believe it or not, this was the first time I have ever used them. They turned out a little bit messy, but quite sturdy. I need to have more practice with this technique because it is a very comfortable necklace to wear, with the suede around the part that touches your neck. This necklace was given to my oldest daughter. She loves when I practice new techniques, because she gets to keep everything that I feel is not perfect enough to sell.
 Cat
Cat
I took a lot of pictures this morning of jewelry to upload to my ArtFire store, but I have been putting off uploading them and creating the listings. I love making beady things, the other tasks that go with the selling, I do not like so much. I need some elves to help me. :)
Here is a picture of one I made the other day, design by Noriko Romanko. For the ends, I used silver end caps. Believe it or not, this was the first time I have ever used them. They turned out a little bit messy, but quite sturdy. I need to have more practice with this technique because it is a very comfortable necklace to wear, with the suede around the part that touches your neck. This necklace was given to my oldest daughter. She loves when I practice new techniques, because she gets to keep everything that I feel is not perfect enough to sell.

Wednesday, November 14, 2012
New Ideas
Since handmade jewelry is such an over-saturated market, almost every piece of business advice I have seen says that in order to distinguish yourself, one should find a niche product and focus on it. The thing is, though, that I like and make all different kinds of jewelry depending on my mood at the time. I don't really think I have a style or a theme that runs throughout all of my jewelry. So what should I do?
Well, for one thing, I think I am going to work more on beaded art projects, which I had almost completely given up. Not sure yet exactly what type of art yet, but I have some ideas beginning to form and I'll follow up on them. You probably won't see the results for a while though, as I build up a body of work.
I have also thought of another niche area I could work in with beads. I am in the process of testing designs to see if what I have in my mind translates into I imagine it being in real life.
Another thing I was thinking about doing is offering one-on-one tutoring. This would be different that the pattern-based bead classes offered in the local bead shops. I would work with only one student at a time, so they would have my undivided attention. My plan is to work on the theory of each stitch, having the student learn it inside and out so that they would then have the tools to envision and create their own designs. Before beginning this venture, I would like to give it some more thought and write out some lesson plans to see if this is a feasible idea.
Of course, all of this does not mean that I will stop making beaded jewelry. I love to make jewelry, and will continue beading it and offering it in my ArtFire shop, which I have just recently resurrected. Here is a picture of a couple of my recent beaded bracelets.

So, those are my plans for 2013. Do you have any yet? Would you like to share them?
Cat
Tuesday, November 06, 2012
Bead, Book, and Bounce
The Bead, Book, and Bounce is a challenge that a group of us beaders participated in. The group is called Operation Tackle That Bead Stash, although we usually do just as much buying as tackling. :) The challenge was to make a box from Julia Pretl's book, Little Bead Boxes and review the book.
I've made boxes from Julia's book before, so I was really looking forward to making another one. And after that huge RAW project that I did, it was nice to get back to peyote. There's just something so satisfying about hearing the 'click' of the beads as they snap into place.
Julia's book is well-written, though I'd advise that you have some experience with peyote stitch before tackling it. She does provide very clear diagrams and explanations for each step, so if you're an adventurous beginner you might give it a try. She also provides word maps for each design. If you've never used a word map before, you're in for a treat! They make following the pattern so much easier, although I still used the graph for backup.
She provides 12 patterns in the book, for different shapes, sizes, and designs. She also includes blank graphs for each shape so that you can design your own little boxes. I got the design for my butterfly box from her website, where she provides additional designs. If you buy a design from the website, you do need to also have the book, as all that is provided is the graph and word chart, no instructions.
I had an older edition of the book, with four boxes in it. If you have that edition, do yourself a favor and buy the newer edition as well. I did. Julia has improved on some of the processes in the newer book, plus you'll be getting 11 additional patterns (one is the same).
Julia recommends using doubled thread, but I used Fireline. I started with 6lb and then switched about halfway through to 8lb, because I didn't feel it was firm enough. Also, I'll give you a big tip: Add the feet to your box when you only have about 3 or 4 rows of the sides done, otherwise it gets too difficult to maneuver the needle around in the box to add them. Another tip is that even if you're an experienced beader, read the book through once before starting a box. Some of it won't make sense until you actually have the box in front of you, but it's still a good idea. You'll know where everything is and be able to refer back when you need to.
Working on the boxes does get a little fiddly and frustrating at times. There are some spots (like the HEM) where it seems almost every time you add a bead you break one, and then have to replace it. But all in all, I really enjoyed making my little box, and I enjoy looking at it on my dresser. I plan to make a few more of them for holiday gifts.

Click here to read book reviews and see boxes from other members of the group.
Cat
Monday, November 05, 2012
Trying Something New
I don't work a lot with strung projects, but I was in the local bead store the other day and this little box of mixed beads just called out to me. I loved the colors of the beads and the freshwater pearls. Here is a picture of the beads after I dumped them out of their little plastic box.

After playing around with them for awhile, I came up with this arrangement. I thought I night put the drop strands on a curved piece of wire, with some seed beads separating the drops, and attach the wire on each end to stringing wire. Then I would string the rest of the strand on each side, adding some beads from my stash to fill it out. I have some pretty light jade colored rounds I can add and I'd use crystals and silver seed beads to round it out.

I'm not completely happy with it, so I'll probably try a few more ideas before I actually start stringing. Anyone have any other ideas, or any comment on this arrangement?
I also have to think of a project for the November OTTBS challenge, and I have to make something from Carol Wilcox's The Art and Elegance of Beadweaving for the Bead, Book, and Bounce challenge. Lots to do, and so little time! I also want to make some more jewelry for sale so that I can fill up my ArtFire store, it looks so empty. :(
Cat
Monday, October 29, 2012
Quickie Bracelet
Now that I've finally finished my Little Box (remember, book review on Nov. 6), I've been playing around with the rest of my beads. I picked up a tutorial for a cute bracelet at my local bead shop, and made it in just a couple of hours.
It's just a row of 8-bead right angle weave made with 15's, long enough to fit your wrist. Then you embellish it on both sides with size 11 seeds, and it naturally twists into a thin round bracelet. I used gold seeds for this one, but I want to try lots of other colors, and also make some multi-strand bracelets with this method. I can also break out my 2mm Swarovski crystals and embellish with those. Ooooooo...sparkles!

How do like my new "artsy" picture style? I like it because I found that with more than just the white in the background, the colors in my beadwork show up more as their true colors. Also, I don't have to do as much editing to my picture afterward to get it to look right.
Hope you're having a great day!
Cat
Sunday, October 28, 2012
Daisy Chain Bracelet
I've been taking breaks from beading my little box and making small projects in between. This one is a bracelet that I saw at one of my local beading stores.
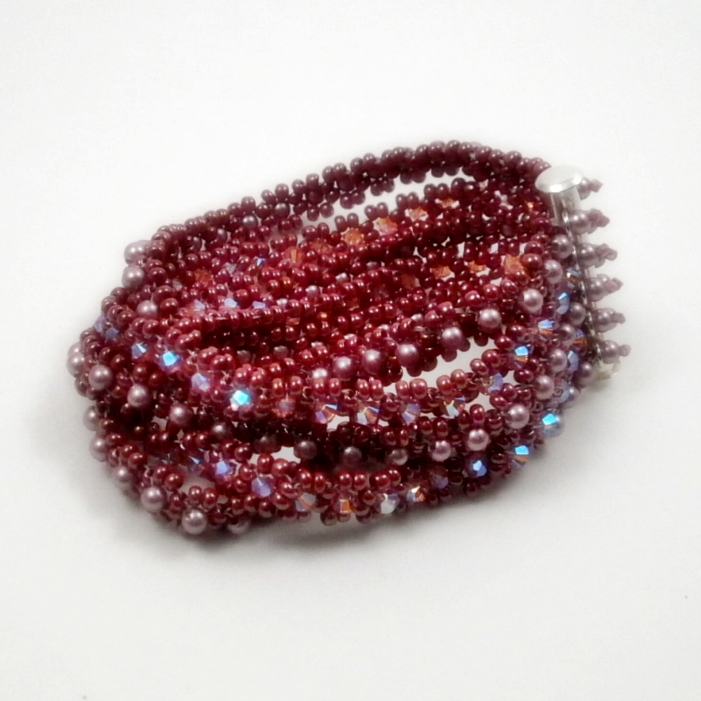
It's just 5 daisy chains, connected at the ends and attached to a slide clasp. It took just a few days to make it, and it was really fun to work on. I live both pearls and crystals, so I was delighted to be able to combine them both in one bracelet. I used rose-colored pearls and crystals, one of my favorite colors. Though when it comes to crystals, I don't think there are any colors I don't like.

The bracelet I saw in the store was 8 chains wide! That would be way too overpowering for my small wrist. In fact, I'm thinking about making another one that is only 3 chains wide.
Cat
It's just 5 daisy chains, connected at the ends and attached to a slide clasp. It took just a few days to make it, and it was really fun to work on. I live both pearls and crystals, so I was delighted to be able to combine them both in one bracelet. I used rose-colored pearls and crystals, one of my favorite colors. Though when it comes to crystals, I don't think there are any colors I don't like.
The bracelet I saw in the store was 8 chains wide! That would be way too overpowering for my small wrist. In fact, I'm thinking about making another one that is only 3 chains wide.
Cat
Sunday, October 21, 2012
Working Hard
I've been putting a lot of beading hours in on my Little Box. I can't show it to you yet though. I belong to a group, Operation Tackle That Bead Stash. We've been challenged with making a project from Julia Pretl's Little Boxes book. Then on November 6th, those who participated will be showing our projects and doing a review of the book. So make sure to come back and see!
I can show you how hard I've been working though.

I think it's time for me to get a new needle out, LOL.
Cat
I can show you how hard I've been working though.

I think it's time for me to get a new needle out, LOL.
Cat
Thursday, October 11, 2012
Those Little Beads Will Fool You
The hardest part, for me, of any project is picking the colors. Even when I know which colors I want to use, like today, it can still be difficult.
I needed five colors for today's project, one of Julia Pretl's Little Bead Boxes. I'm making the butterfly one, and I was trying to match the colors of a beaded butterfly that I bought at the bead show, so that I could sit the little butterfly on top. (and there's another whole story there...the butterfly turned out to be not so "little" in comparison to the box)
So, I pulled about 25 tubes of beads from my stash, and started trying to match colors. One bead would be just the right color, but the finish would be too matte, or the finish would be right but the color would be a little off. Like the Flame Red that turned into orange when I started stitching with it. I finally got settled with all my colors and started my box. And then, right before my eyes, the beads changed color!
The pink and blue beads that looked this in their tubes....
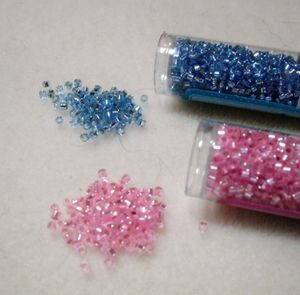
looked like this in my project. :( I couldn't even tell the two colors apart.

So, back to the drawing board again, looking for colors with more contrast. And of course that meant I had to pull apart my carefully stitched little box beginning and re-do it, but I'm much happier now with the two colors I settled on.

See the difference? Much more contrast! Now if only I could somehow shrink that huge butterfly, because the box is a lot tinier than I thought it would be and I don't think the butterfly will fit on top. Keep watching my blog to see how, or if, I solve that puzzle. I may just put a flower on top. Or something else.
But then, that's part of the fun of beading. Your ideas change as the project goes along, and sometimes what you end up with is very different from what you envisioned when you started.
Cat
I needed five colors for today's project, one of Julia Pretl's Little Bead Boxes. I'm making the butterfly one, and I was trying to match the colors of a beaded butterfly that I bought at the bead show, so that I could sit the little butterfly on top. (and there's another whole story there...the butterfly turned out to be not so "little" in comparison to the box)
So, I pulled about 25 tubes of beads from my stash, and started trying to match colors. One bead would be just the right color, but the finish would be too matte, or the finish would be right but the color would be a little off. Like the Flame Red that turned into orange when I started stitching with it. I finally got settled with all my colors and started my box. And then, right before my eyes, the beads changed color!
The pink and blue beads that looked this in their tubes....
looked like this in my project. :( I couldn't even tell the two colors apart.
So, back to the drawing board again, looking for colors with more contrast. And of course that meant I had to pull apart my carefully stitched little box beginning and re-do it, but I'm much happier now with the two colors I settled on.
See the difference? Much more contrast! Now if only I could somehow shrink that huge butterfly, because the box is a lot tinier than I thought it would be and I don't think the butterfly will fit on top. Keep watching my blog to see how, or if, I solve that puzzle. I may just put a flower on top. Or something else.
But then, that's part of the fun of beading. Your ideas change as the project goes along, and sometimes what you end up with is very different from what you envisioned when you started.
Cat
Wednesday, October 03, 2012
Tatiana Necklace Finished
I finally finished making my Tatiana necklace! It is a beautiful pattern designed by Manek-Manek Beads. I'm so excited to have finished it because it is made almost entirely with tiny size 15/0 seed beads, and it took me many days and nights using my magnifier Ott Lamp to weave them all together. I broke a bead or two along the way, and I went through 9 (!) size 13 needles, breaking those mostly when I was trying to maneuver them around the crystals.
The entire necklace is done in Right Angle Weave (RAW), including the bezels. The rope is done in Cubic Right Angle Weave (CRAW). Through making this necklace, I learned a new love for RAW and all the things it can do.
In my September 2 post, I showed you the beads all set up and ready to go.
Here is a picture of the beginning of the necklace as I was just getting started.
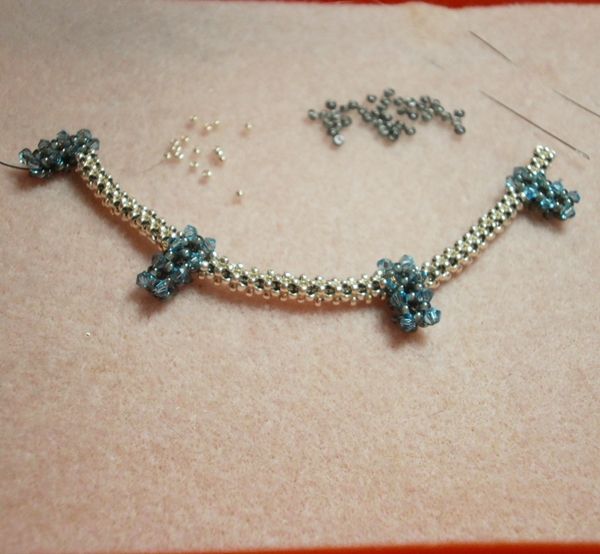
Before I show you the final pictures, I just want to say that this is the first time I have purchased a pattern from Manek-Manek. She has a wonderful way of writing the instructions so that they are easy to understand and follow. The diagrams are clear. She has beautiful designs, and even though some are quite advanced, I have confidence that I will be able to complete any pattern that I purchase from her. She is also very friendly and easily accessible should you need help at any point in your project. I shall definitely be buying more of her beautiful designs in the future to make for myself.
Here is the finished necklace:
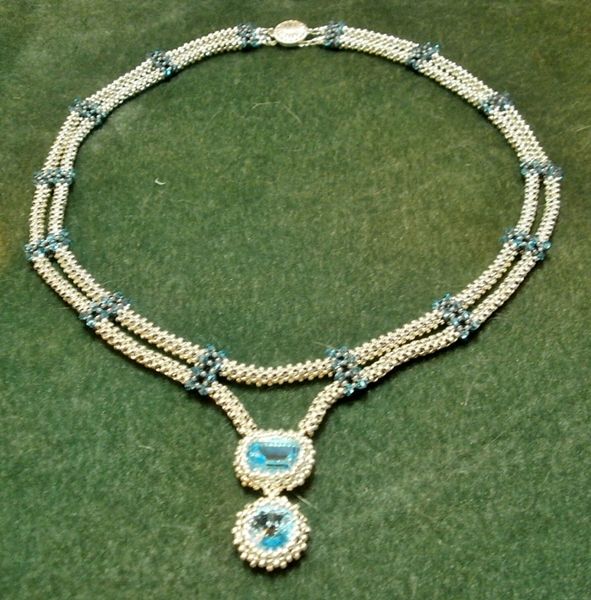
And here is a close-up of the crystal embellishments that I substituted for size 11/0 seed beads in the column bar parts of the necklace:
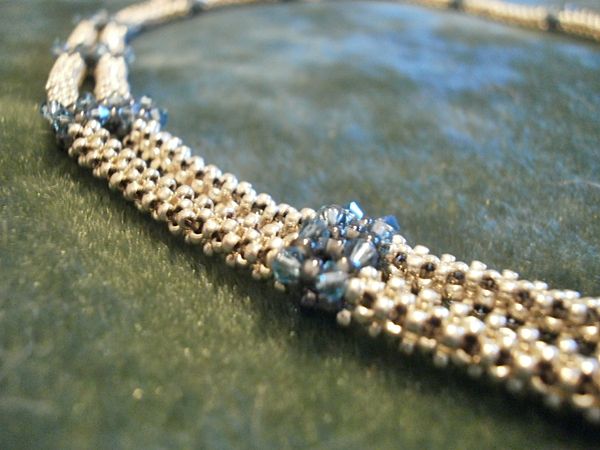
I feel like a queen when I wear it out, even if I'm just going to the grocery store. ;)
Cat
Subscribe to:
Posts (Atom)